Showing posts with label Pintastic. Show all posts

Friday, March 8, 2013

Barrel of Monkeys Cake


So, the actual concept here (and above photo) is my own, for my son's 1st birthday, but it was inspired by the following pin:


http://www.keyingredient.com/recipes/247868093/kit-kat-cake/


I made a layered banana cake from this recipe, and used this chocolate cream cheese frosting recipe, and simply stuck the kit kat bars to the sides, and decorated the top with the monkeys and candle. So tasty and so cute!

Greek Yogurt Banana Bread/Scones/Muffins

I pinned this when I had some greek yogurt to use up, and it turned out fantastic! So moist and yummy. It did go bad faster than regular banana bread though - I didn't notice at first read that she suggests keeping it in the fridge. Mine lasted at least 3-4 days out of the fridge (wasn't as good as fresh, but it was still edible, unlike a couple days later when it clearly went bad), but I imagine it might have lasted longer if I'd kept it in the fridge.


Recipe found at: http://www.cafeterrablog.com/2012/08/05/banana-bread-with-greek-yogurt/

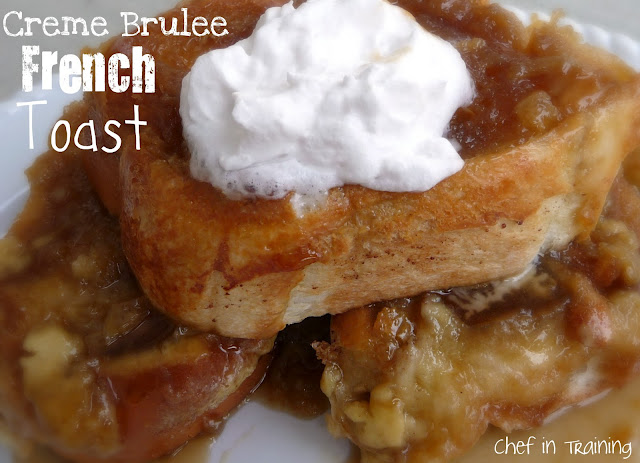
Creme Brulee French Toast


I made this for Christmas morning this year, and it was SO good, and SO easy! I didn't even prep it the night before - just did it in the morning, and it still came out perfect. Definitely pintastic!

http://www.chef-in-training.com/2012/01/overnight-creme-brulee-french-toast/

Friday, January 18, 2013

Pintastic: Hearty Chicken Stew with Butternut Squash & Quinoa Recipe

I tried this recipe back in the fall, to rave reviews and it has now become a comfort food staple in our meal rotation. Hearty, delicious and healthy. It is a multi-step recipe that takes time but, is so worth it! It feeds the four of us for 2 meals.

Original pin here...Hearty Chicken Stew with Butternut Squash & Quinoa

I took this photo as soon as I finished cooking this stew on this very cold New York afternoon. Notice the lack of olives in my version (because, well, gross).
Ingredients:
  • 1 1/2 lb. butternut squash, peeled, seeded & chopped into 1/2-inch pieces
  • 3 1/2 cups chicken broth (I use the full 32 oz carton)
  • 1 1/2 lb. boneless, skinless chicken thighs
  • 1 tbsp olive oil
  • 1 medium yellow onion, finely chopped
  • 1/2 tsp kosher salt (I use Penzy's 4S seasoned salt)
  • 4 cloves garlic, minced
  • 1 1/2 tsp dried oregano
  • 1 can (14 oz) petite diced tomatoes
  • 2/3 cup uncooked quinoa
  • 3/4 cup pitted and quartered kalamata olives (I omit)
  • Freshly ground black pepper, to taste
  • 1/4 cup minced fresh flat-leaf parsley
  1. Steam the butternut squash until barely tender, about 10 minutes. Remove half of the squash pieces and set aside.
  2. Steam the remaining squash until very tender, an additional 4 to 6 minutes. Mash this squash with the back of a fork. Set aside.
  3. In a large saucepan set over medium-high heat, bring the chicken broth to a simmer.
  4. Add chicken thighs, cover, and cook until chicken is cooked through, about 15 minutes.
  5. Transfer the chicken thighs to a plate and allow to cool. Pour broth into a medium-sized bowl.
  6. Return the saucepan to the stovetop and lower heat to medium. Add olive oil.
  7. Add onion and cook, stirring occasionally, until onion is starting to turn brown, 8 to 10 minutes.
  8. Add minced garlic and oregano. Cook, stirring, for 1 additional minute.
  9. To the saucepan, add tomatoes, butternut squash pieces, mashed butternut squash. Stir to combine.
  10. Stir in reserved chicken broth and quinoa. Bring to a simmer, cover and cook until the quinoa turns translucent, about 15 minutes.
  11. Shred the chicken with your fingers or a fork.
  12. Stir the chicken, olives and pepper into the stew and simmer, uncovered, to heat, about 5 minutes.
  13. Stir in parsley and serve.
Notes: Calories 329 / Total Fat 14.1g / Saturated Fat 1.0 / Cholesterol 15.2mg / Sodium 1209mg / Total Carbohydrates 32.8g / Fiber 5.4g / Sugars 3.0g / Protein 19.4g / WW (Old Points) 7 / WW (Points+) 9

Enjoy!
Jen

Friday, December 7, 2012

Brown Sugar and Balsamic Glazed Pork Loin

It took me probably 4 or 5 times putting this on my menu plan before I finally remembered to take our pork tenderloin out of the freezer to defrost in time! But honestly? That was the hardest part of this recipe, haha. It was SO easy, and so good! The only thing I would do differently, is to double the glaze amount. I used it all to baste the pork on the outside, and had none left to drizzle on the sliced meat once served, which would have taken this dish from good to absolutely amazing. The flavor on the outside of the pork was delicious, and the inside was tender and juicy, but it really needed extra glaze to take it over the top, and make it pintastic!!

Roasted Parmesan Sweet Potatoes


I've made this recipe a few times now. They taste fantastic, but it's really tricky to get them crisp but not burnt, especially if you cut them quite small like I did (I had to halve the cooking time, but I wanted them small for my baby to eat as finger food). Watch them VERY carefully. And if you want them crisp at all, you will probably burn the edges of some of them, but most will be ok if you catch it at the right time. My husband hates it when I set off the smoke detector, so personally I think I'm just to give up on crisping them and skip the broiling step. They taste great whether they are crisp or not - definitely pintastic! Original recipe can be found here: http://www.teeniecakes.com/2010/12/roasted-parmesan-sweet-potatoes/

Thursday, October 25, 2012

S'mores Snack Mix

This was a treat I made for Spiderman and a couple of the neighborhood kiddoes.  I already had the chocolate chips.  The mini marshmallows were only a couple dollars, as were the teddy bear cookies.  Once again, I like bang for the buck!  It only took a few minutes to make, and the kids were VERY impressed(chocolate, grahams and marshmellows are all wins). 

The only thing I would caution is to leave PLENTY of cooling time.  It took forever, and I ended up tossing it in the fridge.  The issue was that I used chocolate chips that you'd use for making cookies.  The chocolate is designed to stay kind of melty after baking.  Next time, I will be sure to use candy melts.  Also, the teeny marshmellow bits are NOT with the marshmellows.  They are over by the hot chocolate mixes(save some search time).  You can find full instructions here---  http://cookiesandcups.com/smores-snack-mix/  PINTASTIC!!!

Halloween Candy Wreath

So...  I am all about a big bang for my crafting buck(and time).  I pinned this, I think, last year.  However, I never found the time or energy to get it done.  We moved into a new home this year, and when I looked through my Halloween Board, I knew this one was perfect for Spiderman(my son) and I to take on...  It's also good for letting the neighbor kids know where the fun house is. 

I grabbed a foam wreath for a couple dollars and one of the BIG bags of candy at Walmart.  I chose the one with no chocolate so that I would not be tempted.  It was less than ten dollars, all told. 

We sat down and hotglued candy all around.  I started with the big stuff, and then filled in the holes with the smaller stuff.  It took about an hour, and it was a BLAST for Spiderman and I. 

The neighbors have all commented on how much they like it, and the kids?  Well...  I have a stash of leftovers to keep them from picking at it.  LOL  The project went well and looks great.  Just be sure to use enough candy and really get it filled in.  This one is PINTASTIC!!! 

Monday, October 22, 2012

North Pole Breakfast

Last year I was looking for a way to introduce the Elf on the Shelf tradition in our house. So, of course I turned to Pinterest and found the idea for the North Pole Breakfast. This blogger did an amazing job and I just tried to do the best I could.

I did the breakfast the weekend after Thanksgiving. We usually decorate the house Thanksgiving weekend so I knew we would have everything up. I started purchasing all the knick knacks in November. We talked it up so Henry knew that the Elf was coming at the breakfast.

It was like Christmas morning when he came down the steps.


We read the book about Elf on the Shelf and he named him Donald. After the breakfast we decorated our tree.

It was a fantastic morning and I highly suggest making this a tradition in your house.

Monday, October 15, 2012

Ornament wreath

Here is how the wreath started:


You take a wire hanger and ornaments that do not shatter and thread them onto the hanger. I went to the Dollar store and just picked through what they had. I bought about three different sizes and used red, green, silver and gold. In the tutorial they say to hot glue the tops on but I couldn't get them off to glue them. I did lose some ornaments later when I was moving them around but only about three popped off. I couldn't see a hole so I just let it go.

This is what the wreath looked like when I ran out of ornaments:


Back to the Dollar store I went hoping they still had some more ornaments that I had bought. Thank goodness they did and here is what the finished wreath looks like:


I just used a command strip to hang the wreath over the fireplace. I know it turned out great when even Charlie is impressed with my work. He even brought Henry over to look at it.

The whole project probably cost me under $10 and maybe took me less then an hour. I used close to 80 ornaments but they were all in packs of 5's or 7's and then the really small ones I used as fillers were packs of 14.

I'm really happy I decided to do this craft. It was fun, easy, cheap and looks great!

Thursday, October 4, 2012

Berry Monogram: Pintastic!

As I was pulling together our winter and Christmas decorations last year, I realized that we no longer had a wreath for our front door. Living in a condo with shared stairway access means that we need to keep door decorations on the smaller side so that whatever hangs does not get banged up as our neighbors pass by with bags. This Berry Monogram tutorial I had pinned earlier in the year seemed the perfect solution, and fed my love for monograms: http://www.ourunexpectedjourney.blogspot.com/2011/11/let-decorating-begin.html


I found the letter at JoAnn's for around $2, an $0.89 bottle of red acrylic paint and purchased a berry garland to cut up from the floral department. In all honesty, I purchased two garlands plus some berry picks, not knowing how much I'd need. Let's just say I have enough leftover to make at least one more of this project (or three). One garland would have been plenty!

At home, I painted the monogram red. While that was drying, I clipped different sized bunches of berries from the garland using wire clippers. When the letter was completely dry, I used a hot glue gun to attach the berries. As I went, I chose pieces/bunches that would conform to the shape of the letter and filled in the center after it was outlined. Wherever there was a bare spot, I simply broke off a few berries, added a dab of glue and squeezed them in for fullness.


Once completed, I looped the wired ribbon around the top of the B, tied a bow and added it to our wreath hanger. Easy and loved the finished product!

Project time: 1.5 hrs
Cost: $10 (using coupon/sales)
Supplies:
MDF Monogram
Berry picks or garland
Acrylic paint to match berry color (optional)
Hot glue gun and glue sticks
Wide wired ribbon
Wire cutters and/or heavy duty shears

http://pinterest.com/pin/267612402828631855/

- Posted using BlogPress from my iPhone

Tuesday, October 2, 2012

Spicy [Chicken] Tortilla Roll Ups

 I was really excited about this pin for Spicy Chicken Roll Ups found on this blog. I literally had pin-nesia and pinned it four different times because every time I saw it, I wanted to eat my screen. As the resident Vegetarian of our board, I knew I was going to have to make a few changes to the recipe.

The first time I made it, I subbed a can of drained black beans for the chicken. It made my wraps watery and they were difficult to roll up but they were still delicious. The second time I made them with refried beans and they were a thousand million times better! They rolled up nicely, they stuck together well, and they were like crack. I made them for a game night and every single roll up was gone by the end of the night. Even our non-vegetarian friends were obsessed with them. They are just the right kind of spicy. Not burn-your-mouth-hot, but completely flavorful. They are so easy to make, even my husband can do it!

Super Delicious Spicy Roll Ups
Verdict: Super Pintastic and a hit with everyone.

-AM

Monday, October 1, 2012

Chicken 'N Dumplings

As a true Southern gentleman, my husband loves chicken and dumplings. As a true Southern belle, I should know how to cook it, right? Well, I've always been too scared. I remember my grandmother rolling out dough for hers, and that alone intimidated me enough to not try it. My other grandma makes her dumplings by cutting out tortilla strips, soaking them in water, and covering them in flour. My sister has started making her chicken and dumplings this way, and although I couldn't taste the difference, my husband wouldn't let me try it that way because he wanted it ROLLED OUT like his MAMA did it! I called his mama close to his birthday to get her recipe, because he requested it for his birthday dinner, but she advised against making chicken and dumplings because I would be cooking for a crowd and she said that it didn't always turn out right. This further intimated me. So I made something else and took him to Cracker Barrel later on to get his chicken and dumplings fix.

I pinned this recipe immediately when I saw it, because the description promised a chicken and dumpling recipe done in the crock pot, and my goodness, does it look delicious. One cold February morning when my whole family was home, I decided to attempt these crockpot chicken and dumplings for our lunch.
Recipe
I clicked on the picture to look at the recipe. And guess what, IT'S NOT A CROCKPOT RECIPE. I don't know who originally put that description, but I've seen a million of my friends pin this recipe since then, and it ALWAYS has in the description that it's a crockpot recipe. I used to comment on everybody's pin and correct them, but I got tired of doing it, so I decided they could learn the hard way like I did.

And I forgive whoever posted that description in the first place. Why? Because this recipe is friggin' delicious. So much so that my husband now brags about my chicken and dumpling cooking abilities, and I feel like a rock star because I can make this shizz from scratch, JUST LIKE MY MAW MAW. :) The recipe I linked is accompanied by a wonderful picture tutorial, and it managed to ease the anxiety and stress I felt over making dumlings before I even attempted them. If you like Cracker Barrel's chicken and dumplings, make this recipe. NOW!

To Note:
-I would say that J's mom is wrong and they do turn out the same if you make them following this recipe.  I've made them several times since I first tried it and they always have turned out well.
-My sister insists her way with the tortilla strips is easier, and although it tastes the same, I don't think it's any less work. Both recipes use a lot of flour and make a huge mess.
My Version, served over rice.
Not as juicy looking as the original picture, but damn delicious!
Verdict: Pintastic x100!!!
-Betsy

White Chicken Enchiladas

I found this pin a few weeks ago and loved the step by step directions. It reminded me that I used to cook chicken enchiladas for my husband all the time using his mom's recipe, but I haven't done it in quite a while because I stopped liking to cook. Well, Pinterest has renewed my interest in cooking, so I decided to try this recipe:
Recipe
It turned out pretty good. As Louisianians, we love very spicy food and this wasn't as spicy as we would have hoped for. Maybe Rotel would add a lot to the sauce. Also, I didn't add the corn. I don't think it's something we'll have ALL the time, but it's good once in a while. Great weeknight dinner!
My Version
Verdict: Pintastic!

-Betsy

Sunday, September 30, 2012

Spaghetti Squash au Gratin

OMG. Best way to get your veggies, ever! I ate half of a fairly large spaghetti squash tonight...

I was running a bit short on time and didn't do the onions, red peppers, or thyme - just added a couple tablespoons of margarine and the sour cream and cheese. The top got nicely brown and it tasted amazing. Definitely pintastic - this will probably be the only way I make spaghetti squash from now on!

http://dandydishes.blogspot.ca/2011/10/spaghetti-squash-au-gratin.html#.UGj-K5hJJmw

Friday, September 28, 2012

Baked Apples with Oatmeal Streusel Topping


This is basically a lazy man (or woman)'s apple crisp, and I love it! So much faster than peeling and slicing apples, and it has another advantage of being healthier, since you're eating the skin and there's no sugary coating on the apples themselves - just some sugar in the streusel. And it was T-A-S-T-Y! And pintastic, of course :)

http://nonrecipe.blogspot.ca/2012/03/baked-apples-with-oatmeal-streusel.html

Sunday, September 23, 2012

Sensory Bags for Babies

So, I have lots of ideas for my own versions of these to make, but I started with a basic ocean squish bag. 

Here is the one I made:
I bought the plastic sea creatures from a dollar store, and used food coloring to dye some clear hair gel blue. Then I used blue duct tape around the edges (to seal the top and frame it) and put duct tape across the back to make it a bit less flexible, so it can be squished from the front still but not balled up. I like how it turned out for the most part; I just wish I had used a bit less food coloring, as it is darker than it looks in this picture, and dyed the sea creatures blue as well. Right now my son is more interested in gumming it than anything else, so we may need to wait until his bout of teething ends to get his verdict, but overall I'd say this idea is pintastic! Here is a link to the original pinned website: http://www.growingajeweledrose.com/2012/07/fun-with-sensory-bags.html


Saturday, September 22, 2012

Mocha Iced Coffee Recipe

Bow down to me fellow Mommas, for I am reviewing our first coffee pin. You're welcome.
I found this pin with a super simple recipe for a Iced Mocha.

The long version of the recipe has you add a hot chocolate packet with coffee, sugar, and creamer, whiz it around in your blender, and pour it over ice. I tossed in a few white chocolate chips too and used Vanilla Coconut Milk instead of creamer. I blended it up the first time I made it and it was delish!

The second time I made it, I decided I didn't have time to pull out extra appliances. A blender? Really? Unless I was planning to add ice and make it a Frapp, I had no need for the blender. A plain ol' spoon will do the trick. I wanted hot coffee too since it's fall now and warm coffee make me smile. I tossed a few white chocolate chips into the bottom of my mug, added a whole pack of hot chocolate mix, and added my normal amount of coffee (We have a Keurig and I just brewed what I usually do). I skipped adding sugar since I was adding a whole packet of chocolate. I didn't notice a difference. Then I added my normal amount of milk, swirled with a spoon, and got my happy on.

The "easy" way of making it is definitely faster and has less clean up (win!), but it does leave some chocolate chip residue in the bottom of your mug. I was okay with that. It melted enough to add a taste to my coffee even without blending it.

This has changed my coffee drinking life. I've had more hot chocolate/coffee in the past week than I should probably admit, but it's cool. I'm a mom. Coffee is my fuel.

-AM

Tuesday, September 18, 2012

Copy Cat Zupa's Wisconsin Cauliflower Soup

I love Zupas.  Love love love them.  Honestly I could probably eat their soup every day (if I was rich and could afford to eat out every day).  I don't normally put much trust in copy cat recipes, but I have been craving good soup for a while now so I decided to give this recipe a shot.
Click here for the original recipe


I have a tendency to alter recipes as I go.  Since I was reviewing this recipe I tried to stick to the recipe as closely as possible, but some changes were still made.  First I started out with 3 Tb. of butter instead of two.  I felt like two was going to disappear really quickly when I added the onions.  When I added my diced onions to the pan, I knew that 3 Tb. was much better.

The part of the recipe that I had an issue with was the adding flour and salt.  The original recipe says to let this cook for two minutes.  1/4 cup of flour added to 3 Tb. of butter and onions is sucked up really quickly.  If you wanted to make a thinner roux (which I'm assuming the recipe was trying to achieve at this point) you would only add a tablespoon or so of flour before adding more liquids.  So if you wanted to more closely follow the recipe I would suggest flour then liquid and repeat until you're out of flour.  I added all of the flour, whisked it around and then added some of my milk.  

I did straight milk instead of water because I wanted my soup to be creamy and thick.  After adding all of the liquids, I added the cauliflower as directed.  I let the cauliflower reach a boil and then turned it down.  I simmered mine for closer to fifteen minutes.  I wanted it to be pretty soft when I threw it in my food processor.  

After processing the soup (I did mine in two batches, but my food processor is pretty large), I added it all back to the pan.  At this point I added a lot more salt, some pepper, the mustard, and my cheeses (I did 1 1/2 of pepper jack and 1/2 cup of extra sharp cheddar to start).  After letting it cook for a minute (so yeah I ignored that part of the recipe too) I added more salt and another 1/2 cup of extra sharp cheddar.

The end result was a tasty soup.  Was it as good as Zupas?  Not even close.  But it was a good homemade soup.  Personally I would have added another cup of cheese, but my family isn't as cheese happy as me.  I added some to my bowl though and it was quite tasty.  Before I try this again, I might visit Zupas and try to figure out what flavors I'm missing.  Like I said, this is a good cauliflower soup and it's pretty simple to make.  But if you're expecting it to taste like Zupa's cauliflower soup, I think you'll be disappointed.  

-KP

Hamburger Cupcakes and Sugar Cookie Fries

A few days before our Labor Day cookout, I decided to search Pinterest for a fun dessert. I found this pin that linked to this blog with a super fun cupcake idea. The basic idea was to make cupcakes, cut them in half, put a brownie as a burger and then jazz it up with some colored "ketchup" and "mustard" icing. It sounded easy enough and I was so excited to make a super cute dessert.

The first thing I did was make a batch of cupcakes with liners. I thought I'd be sneaky and do the "add a diet soda to cake mix" trick that's floating around pinterest too. I mean, I was putting a brownie in the middle of the cupcake... I had to 'skinny' them up somehow. I used a yellow cake mix and diet ginger ale. I always have a problem with my cupcakes (or muffins) sticking to the paper liners... and that caused a bit of a problem. I put a few in the fridge over night to see if that would help and left a few out. The ones I left out fared the best. Don't put them in the fridge. It didn't work and I had to toss out a few cupcakes.

So, now I had a couple "skinny" cupcakes to work with. (and the diet soda trick - Super Pintastic except for the sticking. It was so easy and you really couldn't taste a difference. I think it makes them more moist).


The next day I baked my brownies. You can do the diet coke trick here too, but I didn't since I've never tried it with brownies before and didn't know how it would change them. I didn't have a round cookie cutter, and found out that an Avent bottle cap made the perfect sized 'burgers.' Mom ingenuity at its best!


Here's where it got messy. I wanted to get a bunch of 'burgers' so I started punching holes right at the edge. Well, you know the nice, crunchy edge brownies get? It's not very good for cutting with a plastic bottle cap. Just start more in from the edge and you'll be fine. I was afraid I wouldn't have enough, but I did. As you can see, the most you could get would be about 14 burgers anyway, so my cupcake disaster didn't make a difference anyway. 


Now you'll have a bunch of extra brownie pieces left over. I'm sure you'll figure out something you can do with them... I'll wait while you stuff your face with them... Mmm.
 
 
I bought a box of sugar cookie mix and followed the direction on the blog to make roll out cookies. I didn't really have a problem with the fries at all. Mine expanded like she said they would. I just cut them in half again when they came out of the oven with a pizza cutter. Warning: The sugar cookie fries are addicting. You will eat a ton of them. Some will break or won't be perfect and you will have to dispose of them accordingly. Don't worry. I won't tell.
 
I decided to skip the "lettuce" icing and just stick with the "ketchup" and "mustard." It was really hard to find get a shade of red that didn't look pink, but it worked and everyone drooled over my adorable little burger cupcakes and fries. It fooled almost everyone.

"Burger and Fries" cupcakes and cookies
The verdict: These turned out super adorable and I got a lot of attention for making them (and who doesn't LOVE that!) so overall I would say they were Pintastic. The only problem was they took forever to make. I really didn't put it together that I would have to bake cupcakes, brownies, and cookies for two days. It was a lot of baking and then assembling. These would be great to take to party, but if you're HOSTING the party (like me), save some time and don't make these. You have more important things to worry about... you know, like the actual hamburgers.
 
 
-AM